menu.png

Three Spooky Halloween Recipes You Can Cook With Your Kids

It’s that time of the year again! No, not Christmas — Halloween! But instead of cooking all by yourself, you can include your kids in preparing the Halloween’s food. We have three party dishes from the book The World in My Kitchen for you.

Old Lady Chicken Fingers
Prepare the dish as explained by the book. Before serving, put a dash of ketchup on one end of the finger and place an almond on top of it. Now, they really look like fingers!

wimk_africa_chickenfingers

Chicken Fingers (Africa, Mauritius)

Ingredients:

  • 3 skinned chicken breasts, about 400g/14oz total weight
  • 4 tablespoons plain/all-purpose flour
  • 2 eggs
  • 1 teaspoon ready-crushed  wet garlic
  • 1 teaspoon ready-grated  wet ginger
  • 1 pinch of ground black pepper
  • 6 tablespoon fine polenta Extra equipment: baking sheet and baking parchment, pastry brush

Method:

  1. Cut the chicken breasts up into finger-size pieces, using scissors. Try to make them all about the same size so they will cook in the same time. Line a baking sheet with baking parchment.
  2. Put the flour into a bowl. Lift the chicken pieces into the bowl and cover all over with flour.
  3. Break the eggs into a cup and tip into a second bowl. Add the crushed garlic, grated ginger and black pepper and mix together with a fork. Put the polenta into a third bowl.
  4. Lift a piece of floured chicken into the flavoured beaten egg to cover the flour, and then into the polenta. Put onto the baking sheet. Repeat this until all the chicken pieces have been covered in polenta. Now wash your hands. Lightly dab the top of the chicken fingers with a little more oil, using a pastry brush.
  5. Ask your adult to put the baking sheet in the oven, using oven gloves.
  6. Bake for 20 minutes until the chicken coating is golden and crunchy, the chicken is tender and the pieces are cooked through to the middle (not pink).
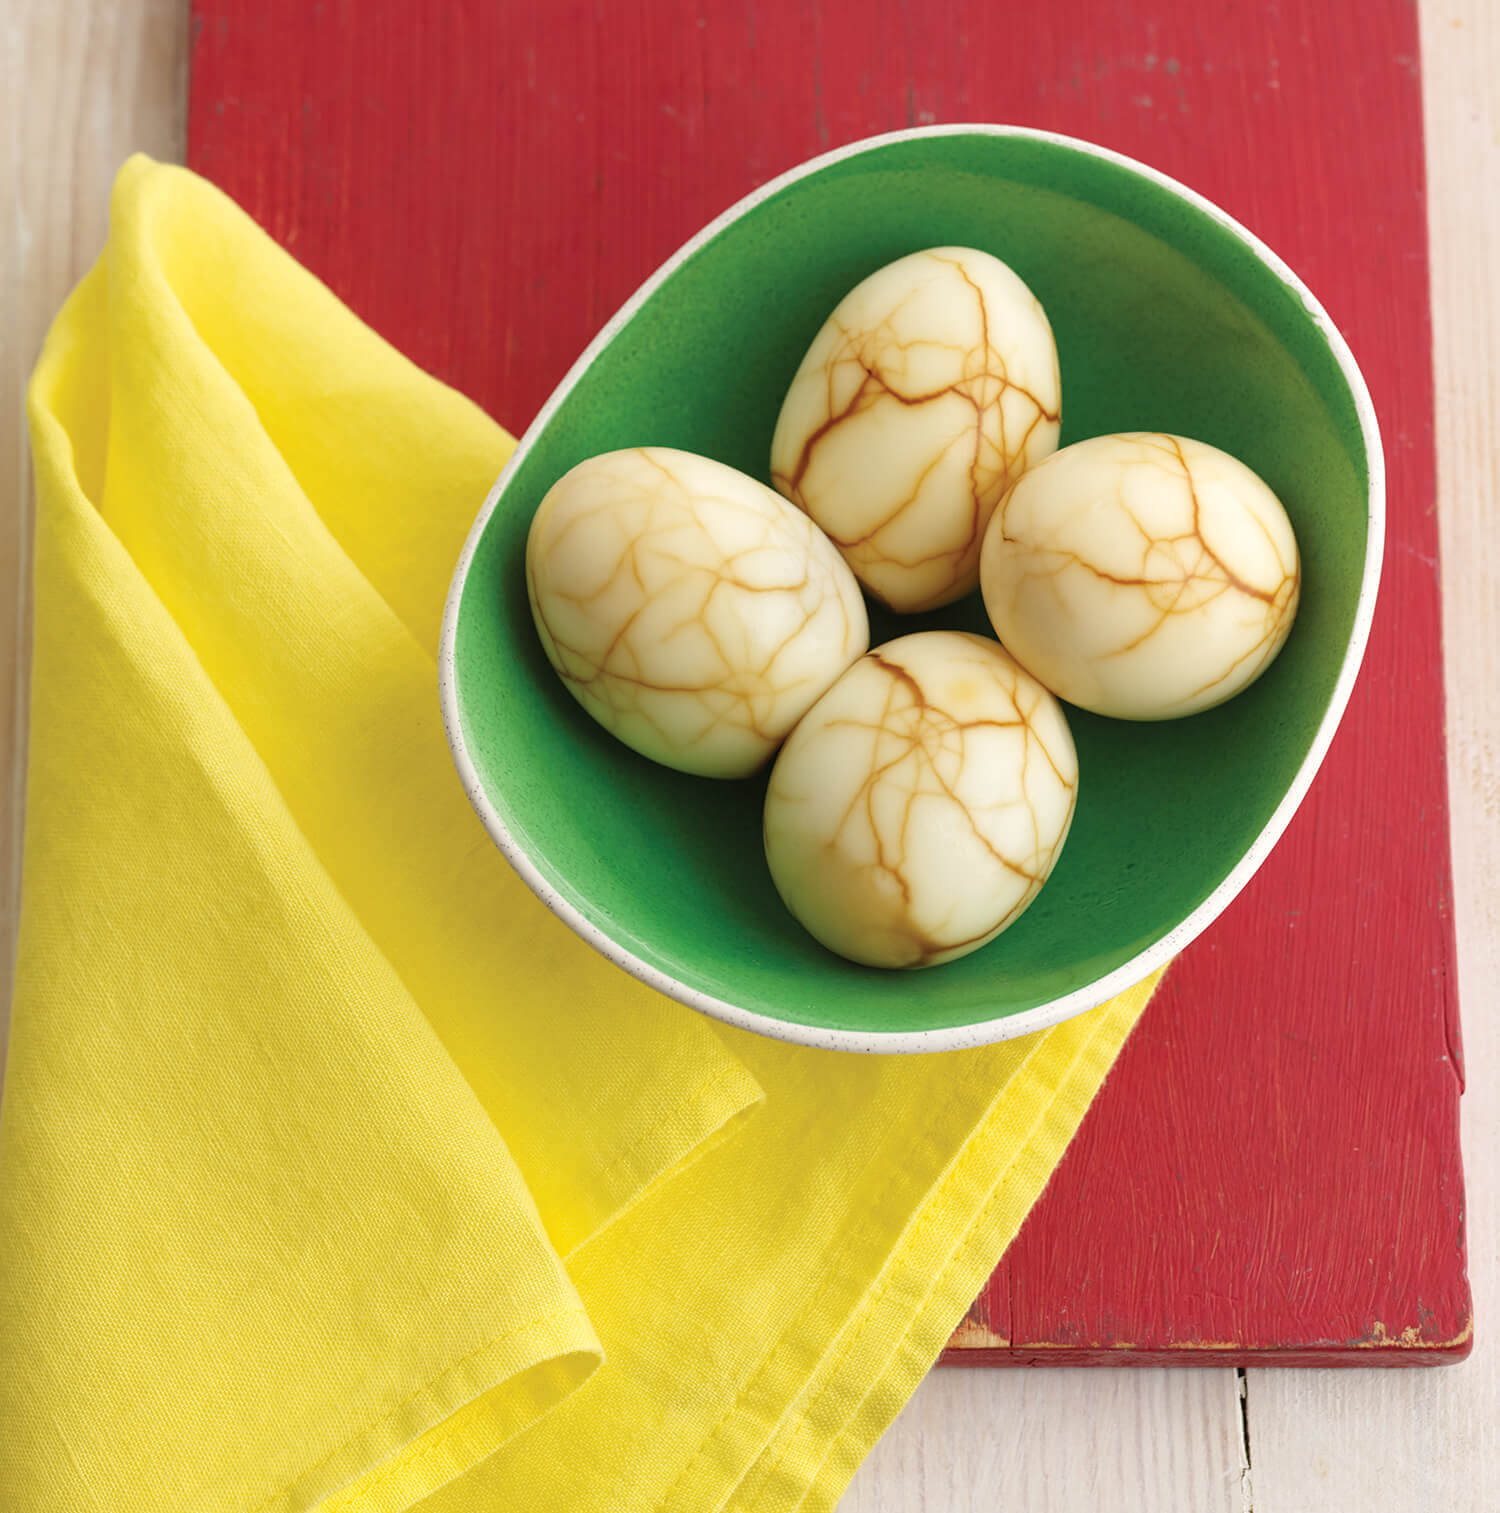
Monster Eggs
These eggs already look pretty monstrous! For variety, you can experiment with food colouring!

After you have cooked them, peel off the shells of these magical tea eggs to reveal fabulous coloured patterns. Cracking the shells lets the colours in the water make patterns on the egg whites inside the shells.

wimk_asia_chineseteaeggs_1

Chinese Tea Eggs

Ingredients:

  • 4 eggs, at room temperature
  • 3 tablespoons soy sauce
  • 3 decaffeinated tea bags
  • 1 heaped tablespoon chopped glacé/candied peel

Method:

  1. Put the eggs into the saucepan and fill with cold water so that the eggs are just under the water.
  2. Ask your adult to put the pan on the hob/stovetop over a high heat and bring to the boil. Turn the heat down and boil for 10 minutes. Then ask them to take the pan off the heat and put it into the sink.
  3. Run cold water into the pan for 5 minutes until the eggs are completely cold.
  4. Gently tap the eggs with a tablespoon so that the shells crack a little all over. Put the eggs back in the pan and fill it with cold water again. Add the soy sauce, tea bags and glacé/candied peel.
  5. Ask your adult to boil the eggs for another  55 minutes. You may need to ask them to top up with more boiling water. Then ask them to take the pan off the heat and put it into the sink.
  6. Run the cold water into the pan for 5 minutes until  the eggs are completely cold. Peel off the shells to see the patterns you have made. Eat the patterned eggs as a snack, just as the Chinese do.

Bloody Demon Eyes
Prepare the Buns as explained in the recipe. Look at the picture: The jelly resembles the blood, the cream/yoghurt the white eyeball – you just need to add raisins/ pieces of chocolate or some other ingredient for the pupil.

wimk_namerica_teabuns_2

Newfoundland Tea Buns (Canada)

Put a few grapes in the freezer when you go to school, then they’ll be frozen and ready to eat as another type of Canadian after-school snack.

A chewy, fruity little bun, children all over Canada often enjoy these buns freshly baked when they arrive home from school needing a tasty snack to keep them going until dinner.

Ingredients:

  • 300g/10oz/2½ cups plain/ all-purpose flour, plus extra for dredging
  • 2 teaspoons baking powder
  • 90g/3oz/½ cup caster/superfine sugar
  • 100g/3½oz butter, softened
  • 70g/2½oz/½ cup raisins
  • 2 tablespoons lemon juice
  • 6 tablespoons milk, at room temperature
  • Extra equipment: dredger, 5cm/2in cookie cutter, baking sheet and baking parchment

Method:

  1. Mix together the flour, baking powder and sugar in a mixing bowl with a fork.
  2. Cut the butter into small cubes, using a table knife. Rub the butter into the flour until it looks like fine breadcrumbs. Add the raisins and lemon juice and stir well.
  3. Add 1 tablespoon of the milk and stir. Everything will start to stick together. Add another tablespoon of milk and stir again until you have a large, soft dough ball. If it doesn’t make a dough, slowly add the rest of the milk and keep stirring until it does.
  4. Sprinkle a little flour on the work surface with a dredger and put the dough on it. Flatten the ball with your hands so that the mixture is about 2cm/½in thick. Cut out about 12 buns with a 5cm/2in cookie cutter.
  5. Line a baking sheet with baking parchment. Put the buns on the sheet. 6  Ask your adult to put the baking sheet in the oven, using oven gloves. Cook for 10 minutes until slightly risen and golden. In Canada, they serve these buns with dollops of thick cream and jam. You could try it with yogurt instead.

2502_WIMK_cover_WEL_pb.indd

Sally Brown and Kate Morris
The World in My Kitchen
£12.99, available from Nourish Books


Meet Renee McGregor, our Guest Instagrammer!

Renee McGregor is one of the UK’s top sports nutritionists, advising athletes from amateur to Olympic levels. With years of experience and expertise in sports nutrition, she offers vital and unequalled insight into what you need to fuel your success in your given sport.
This week we publish her new books: Fast Fuel: Food for Triathlon Success and Fast Fuel: Food for Running Success.

Take a look at our Instagram account, Renee will be our guest Instagrammer from Tuesday until Friday this week.


Bring Autumn Colour to Your Lunchbox

squahsmarket

As the days get colder, sandwiches and summer salads don’t always satisfy us at lunchtime. With a little planning and preparation you can have satisfying and comforting seasonal lunches every day of the week.

  1. Pile up your veggies. Workloads often build up during the autumn months, and combined with chillier days means you need help fighting off any train and office colds. Try to make sure that at least half your lunch is made up of immune-boosting veggies. Soups are a great way to pack them in, and did you know you can just add a handful of leaves and stir in? Rocket, kale and watercress go well with lots of soups; just stir in a handful for a boost of vitamin C, beta-carotene and other antioxidants. Simply pack the leaves in a separate container and stir into your soup when you’re ready to eat.
  2.  

  3. Plan ahead. Make a big batch of soup, curry or chilli one evening or at the weekend. Freeze individual portions so you always have something you can take to work. Take a flatbread with you and you have an amazing lunch.
  4.  

  5. Squash in some nutrients. Nothing says Autumn quite like the piles of multi-shaped squash you find in farm shops and supermarkets at this time of year. Squash last for ages before you cut them open and are a really versatile ingredient. The brightly coloured orange flesh of pumpkin and butternut varieties is full of beta-carotene, a powerful antioxidant which plays an important role in skin and eye health. Cut your squash into chunks (skin on if you like) and toss in olive oil before roasting. When cool add leaves, feta cheese and lentils, or whatever you have in the kitchen to make a great packed lunch.
  6.  

  7. Beet yourself up. Beetroots boast an impressive nutrient content. They are rich in anthocyanin, which gives them their crimson colouring and makes them a powerful detoxifier. Wrap them in foil and roast in their skins to keep the nutrients intact. You can then peel and slice when ready to use and add to salads. Beetroot also make a rich, earthy base for dips or soups. You can also eat their iron-rich leaves in salads but only whilst they are still crisp and fresh.
  8.  

  9. Make a satisfying slaw. Red cabbage, carrots and apples all last for ages and make a very quick slaw. Slice a chunk of cabbage and an apple, mix in a grated carrot, add a few pumpkin seeds and mix with a teaspoon of Greek yoghurt for a delicious super-fresh slaw. As well as being easy on your wallet, cabbage is great for your tummy promoting lots of friendly bacteria. Red cabbage also contains plenty of disease fighting antioxidants responsible for its pigmentation.
  10.  

  11. Pack smart. Treat yourself to a funky new wide-brimmed thermos flask to take soup, stews and chillis to work. Fill it with boiling water for a minute or two before emptying, then add your hot lunch; no need to microwave at work. The money you save on takeaway soup will pay for it in a week.

3 Ways With Squash

  • Chop up your squash and roast with some olive oil, sea salt and freshly ground black pepper. Add them to soups or stews for some fibre-rich slow-releasing energy and ditch your bread roll.
  • Store your roasted squash in the fridge as a filling base for an autumnal salad. Place a handful into a lidded jar or container, add some sliced red onion and chopped red pepper. Crumble over 50g of feta cheese and top with two handfuls of green leaves such as rocket or watercress. A dressing of balsamic vinegar and extra virgin olive oil will perfectly complement the roasted squash.
  • Blend the roasted squash with some pine nuts, butterbeans, garlic and lemon juice to make a yummy dip. Oatcakes, chicory leaves and celery sticks make tasty dippers.

Becky Alexander is a food writer (The Guild of Food Writers) and food book editor for companies such as Dorling Kindersley, Penguin and Bloombsury. She writes a fortnightly food column for The Herts Advertiser newspaper focussing on seasonal, local food. Becky recently appeared on a BBC Radio programme giving commuters easy ideas for their lunches. Michelle Lake DipION CNHC mBANT is a registered Nutritional Therapist and has been running her own busy practice, Mission Nutrition in St Albans for over 7 years. She trained for four years at the Institute of Optimum Nutrition on its internationally acclaimed nutritional therapy course. She is a member of BANT (British Association for Applied Nutrition and Nutritional Therapy and The Nutritional Therapy Council (NTC).

packed


Becky Alexander, Michelle Lake
Packed
£12.99, pre-order from Amazon


The Great British Fake Off

baguette-main

This article is adapted from Slow Dough by Chris Young.

Like the word bread itself, the terms ‘artisan’ and ‘craft’ have no legal definition. This means anyone can call themselves an artisan or craft baker and market their loaves as artisan or craft bread. The production methods used may not be obvious and, in the case of loaves that aren’t pre-packed – such as those from a supermarket in-store ‘bakery’ – you’ll have your work cut out to find whether or not artificial additives have been employed.

Though some of the differences between Real Bread and industrial loaves may be obvious, labelling and marketing regulations and the way they are policed in various countries can leave loopholes that deny shoppers the right to know exactly what they’re getting.

Knowing that many of us find a litany of chemical names or E numbers off-putting, some manufacturers are now turning to so-called processing aids. By a quirk of EU law, if an artificial additive is deemed to be a ‘processing aid’, it does not have to appear on the label, as long as any ‘residues do not present any health risk and do not have any technological effect on the finished product.’ As a consequence, suppliers often market these as ‘clean label’ or ‘label friendly’. Companies may defend the use of processing aids with comments along the lines of ‘we always comply with the law’, or ‘they get used up during manufacture’ even though despite the fact that their use may, quite legally, ‘result in the unintentional but technically unavoidable presence of residues of the substance or its derivatives in the final product’.

An allegedly ‘fresh baked’ unwrapped loaf sold by a supermarket, convenience store, petrol station or other retailer may have been manufactured a long time ago in a factory far away, then chilled or frozen. Having then been re-baked in a retailer’s ‘loaf tanning salon’ oven increases the energy consumed in production, and results in a loaf that may well stale faster than a genuinely fresh one. Not that you’d know any of that, so you could be forgiven for making a like-for-like comparison with a loaf of Real Bread from a local independent bakery, which helps to sustain more skilled jobs per loaf for local people making genuinely freshly baked bread without the use of artificial additives. Which part of this is fair on you the shopper or a genuine artisan baker?

Perhaps it’s time to BIY – bake it yourself.

Chris Young is Campaign Co-ordinator for The Real Bread Campaign, a charity project with a mission to promote additive-free bread. In addition to compiling this book, Chris edits the quarterly magazine True Loaf, and wrote Knead to Know, the campaign’s first book. His work has appeared in publications including Spear’s Magazine, The Real Food Cookbook and the London ethical food magazine, The Jellied Eel, which he also edits.

Slow-Dough-300x386

Chris Young
Slow Dough: Real Bread
£20.00, available from Nourish Books


Home