menu.png

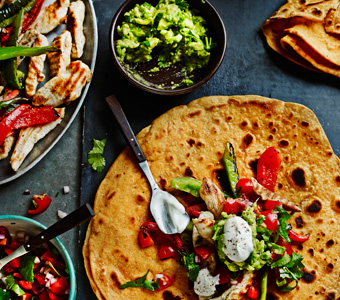
Chicken Fajitas and Homemade Smoked Paprika Wraps – simple sharing food for friends

From Marcus Bean’s Chickenavailable for pre-order from Amazon now.

 
Fajitas are a great choice for an informal supper with friends, and with griddled chicken breasts, which are naturally low in fat, they are also a healthy option for sharing food – not that you’d know that to taste them! The wraps are simple to make, and if you have time to make your own salsa and guacamole, too, all the better. Your friends are sure to be impressed – and they’ll enjoy it all the more if you stock up on a few bottles of Mexican lager to wash it all down.


Chicken fajitas & homemade smoked paprika wraps

Serves: 4

Preparation time: 10 minutes, plus making the wraps, salsa and guacamole

Cooking time: 20 minutes
 

4 skinless chicken breasts, cut into 8 even-sized strips
2 tbsp olive oil
1 red pepper, deseeded and cut into strips
1 green pepper, deseeded and cut into strips
sea salt and freshly ground black pepper
4 tbsp soured cream, to serve

 
For the Smoked Paprika Wraps:
400g/14oz/scant 3¼ cups plain flour, plus extra for dusting
1 tbsp smoked paprika
1 tsp salt
1 tsp freshly ground black pepper
1 tsp baking powder
30g/1oz unsalted butter, diced
a little oil, for greasing

 
For the Tomato Salsa:
4 large ripe vine tomatoes with seeds, finely chopped
½ red onion, finely diced
2 spring onions, finely sliced
2 tbsp chopped coriander leaves
1 tbsp chopped chives
1 green chilli, deseeded and finely chopped
sea salt and freshly ground black pepper

 
For the Guacamole:
2 ripe avocados
juice of ½ lime
1 tbsp chopped coriander leaves
1 tbsp sea salt
1 tsp freshly ground black pepper


1. To make the wraps, mix together the flour, smoked paprika, salt, pepper and baking powder in a bowl. Add the butter and rub together until the mixture resembles breadcrumbs. Gradually add 400ml/14fl oz/generous 1½ cups boiling water, mixing with a wooden spoon and gradually bringing the ingredients together to form a soft dough.

2. Knead the dough on a lightly floured work surface for 1–2 minutes until smooth, then put in an oiled bowl, cover with cling film and leave for 10 minutes. Divide the dough into 12 equal portions, roll into balls and keep covered.

3. Put a piece of baking paper on the work surface and dust with flour. Put the first portion of dough on the paper, sprinkle with flour and lay another piece on top. Roll out the dough thinly between the sheets, turning every roll to keep an even shape. Repeat with the rest of the dough.

4. Heat a large, dry frying pan over a high heat. Add the first wrap and cook for about 30 seconds on each side until just browned. Remove from the pan and leave to cool. Repeat to cook the remaining wraps.

5. To make the salsa, put all the ingredients in a large bowl. Whisk together until well blended, then season with salt and pepper to taste.

6. For the guacamole, cut the avocados in half, remove the pits, then scoop out the inside, using a spoon, and put into a bowl. Add the lime juice and crush with the back of a fork, then add the coriander and season with salt and pepper to taste.

7. Put the chicken in a bowl, drizzle with the oil and season with salt and pepper.

8. Heat a griddle pan over a high heat until it just starts to smoke, then add the chicken, in batches if necessary, and cook for 1–2 minutes on each side until it has charred markings. Repeat with the peppers.

9. Serve the chicken and peppers with the wraps, soured cream, salsa and guacamole so your guests can wrap and enjoy their own fajitas.


“In Chicken I have set out to give you the best of the classic chicken recipes, experimenting with modern and unexpected twists along the way. But I have also created new recipes, exploring great flavour combinations that I hope will help you to revolutionize the way you cook with chicken.”
 

Chicken – The New Classics by Marcus Bean

Out September 2014

Chicken---The-New-Classics-by-Marcus-Bean

Available for pre-order from Amazon now


Celebrate National Burger Day with Pork Burgers with Blue Cheese & Red Onion Salsa

From Liz Franklin’s Express Meals.

It’s National Burger Day today, but why stick to a classic beef burger? For an exciting twist try these succulent pork burgers with a sweet red onion salsa and punchy blue cheese. Use good-quality lean pork mince, accompanied by a small amount of a strong-flavoured blue cheese, such as Roquefort or Gorgonzola, and these make a healthier and altogether more tasty cheeseburger.
 

Pork Burgers with Blue Cheese & Red Onion Salsa

Serves: 4

Preparation time:15 minutes

Cooking time:10 minutes

450g/1lb good-quality pork mince
1 onion, finely chopped
2 tbsp soy sauce
115g/4oz blue cheese, such as Roquefort, Gorgonzola or Stilton, sliced
salt and freshly ground black pepper
4 crusty bread rolls and rocket salad, to serve

For the Red Onion Salsa:
2 tbsp olive oil
2 red onions, cut into thin wedges
2 tbsp balsamic vinegar
1 tbsp chilli oil


1. Preheat the grill to high.

2. In a large bowl, mix together the pork mince, onion and soy sauce, then season with salt and pepper. Form the mixture into four burgers.

3. Grill the burgers for 4 minutes on each side until cooked through. Top each burger with a quarter of the cheese and grill until melted.

4. In the meantime, make the red onion salsa. Heat 1 tablespoon of the olive oil in a griddle pan over a high heat. Griddle the onion wedges for 10 minutes, turning occasionally, until softened and charred in places. Remove from the heat and stir in the balsamic vinegar, chilli oil and the remaining olive oil.

5. Place one half of a roll on each serving plate. Top with a burger and a spoonful of the onion salsa. Place the other half of the rolls to the side and serve with a rocket salad.


Perfect for the busy home this stunning collection features recipes you can make in 5, 10, 15, 20, 25 and 30 minutes .

Express Meals


Find out more, and get free postage on all UK orders


Light low-carb lunch: Tofu-Stuffed Red Peppers

From Laura Lamont’s The New Low-Carb Diet Cookbook.

This is a great low-carb vegetarian choice for a filling lunch. The sweetness of the peppers works wonderfully with the creamy melted cheese.
 

Tofu-Stuffed Red Peppers

Serves: 2

Preparation time: 15 minutes, plus 4 minutes soaking

Cooking time: 35 minutes
 
4 red peppers, deseeded and halved vertically
400g/14oz firm tofu, finely chopped
1 garlic clove, finely chopped
¼ red onion, chopped
4 mushrooms, chopped
1 tsp chopped oregano leaves
1 tbsp passata
1 tsp stevia powder
½ tsp smoked paprika
80g/2¾oz mozzarella cheese, grated
freshly ground black pepper
2 large handfuls of mixed salad leaves, to serve


1. Preheat the oven to 180°C/350°F/gas 4. Put the red peppers in a bowl, cover with boiling water and leave to stand for about 4 minutes until softened slightly. Drain and pat dry on kitchen paper.

2. Heat a non-stick frying pan over a low heat and add the tofu, garlic, onion, mushrooms, oregano, passata, stevia powder and paprika, then season to taste with pepper. Stir until heated through, then leave to simmer over a low heat for about 10 minutes until the onions and garlic have softened, adding a splash of water, if necessary, if the ingredients begin to stick. Remove from the heat and leave to cool for a few minutes, then stir in the mozzarella and mix together well.

3. Put the red peppers, skin-side down, in a baking tray and spoon the mixture evenly into the peppers, packing it into the centre of each one. Bake for about 20 minutes until the red peppers are tender and the topping is bound by the melted mozzarella. Serve hot with the mixed salad leaves.


If you’re looking for a new approach to healthy eating and weight loss, nutritional therapist Laura Lamont’s The New Low-Carb Diet is the effective long-term answer.

 
New Low Carb Diet recipes

“Groundbreaking recipes for healthy, long-term weight loss”

The New Low-Carb Diet by Laura Lamont
 

Find out more, and get free postage on all UK orders


Eat Yourself Pregnant – it takes two: the fatherhood factor

From Zita West’s Eat Yourself Pregnant.
 

Zita West is the UK’s most trusted expert on fertility. In her new book, Eat Yourself Pregnant, she explains that even though conception takes place in the woman’s body and she will carry the baby, we now know that half of all fertility problems are down to what’s going on inside the man. In this extract from the book, Zita gives important nutritional advice for hopeful fathers-to-be.
 

In some ways men are luckier than women – whereas a woman is born with all the eggs she will ever have in her lifetime, a man will produce sperm 24 hours a day for seven days a week. While there comes a time in a woman’s life when she is no longer able to become a mother, a man can become a father (in theory) until his dying day. Nonetheless, studies show that men shouldn’t become complacent. Here, I want to focus on what’s going on inside the man’s body and show you why it’s so important that fathers follow a healthy diet, too.
 

The structure of sperm
The sperm cell is much, much smaller than the egg cell and consists of the head (which contains the genetic material), the mid-piece (which is the energy powerhouse of the sperm) and the tail (which propels the sperm forward). The head of the sperm is covered with a cap called the acrosome, a fine membrane that is vulnerable to damage and has to come off before the sperm can penetrate the egg.

 
Making sperm
The most important role a man has in the process of babymaking is to deliver healthy DNA via sperm carried in his semen. Most of the fluid in semen is made up of secretions from the male reproductive organs and contains citric acid, amino acids, fructose, enzymes, prostaglandin, potassium and zinc. Semen is slightly alkaline.
 
Sperm are made in special tubules, called seminiferous tubules, in the testes. It takes around 100 days altogether for each sperm to become fully grown – 74 days for a single sperm to develop, before it moves from the tubules into a coiled tube called the epididymis, where it spends 20 to 30 days maturing. Over that time, what a man eats and the lifestyle choices he makes can have their own impact on how healthy each and every one of his sperm will be.
 
Sperm need enormous amounts of energy. Think of the scale of the journey they undertake relative to their size. From inside the scrotal sac, they are propelled out of the penis into the woman. Passing along the woman’s reproductive tract to get to the egg is like a human swimming the Pacific Ocean. But each sperm not only has to make the journey, it also has to win the race.
Each sperm swims as fast as it can to get to the woman’s fallopian tube first. Once there, the winning sperm has to drill into the egg to download its most precious genetic material.
 
Forty million sperm or more are ejaculated and begin to make this journey. At ejaculation a large amount of seminal fluid is produced. Sixty-five per cent of it is made up of fructose to give the sperm energy for their journey. The remainder of the ejaculate comes from the prostate and is rich in zinc, which sperm need in order to stay healthy on their journey and to stabilize their DNA.
 
Despite the millions of sperm that enter the woman’s body, only about 200 will reach the fallopian tube, helped by the woman’s alkaline vaginal secretions. Sperm can usually survive between three and five days once inside the woman’s body.

 
What is the sperm carrying?
The head of the sperm contains half a baby’s DNA (half the baby’s genetic blueprint; the other half is in the woman’s egg). In the egg, the DNA is tightly packed into an X sex chromosome. Sperm may carry their DNA in either an X or a Y sex chromosome. The sperm’s chromosome pairs with the egg’s chromosome to make either XX (which results in a baby girl) or XY (a boy).

 
What constitutes healthy sperm?
In each ejaculate there are millions of sperm but not all are normal – in fact, a high percentage is abnormal. To assess the health of the sperm, a doctor will make a semen analysis. This looks at the sperm count (the number of sperm per millilitre of semen), sperm motility (quality of motion) and sperm morphology (shape), assessing the head, tail and neck of the sperm.
 
Key factors for healthy reproduction are:
• the ejaculate needs to contain more than 20 million sperm per millilitre
• the volume of each ejaculate needs to be 2 millilitres
• more than 50 per cent of the sperm in each needs to be moving properly
• 4 per cent or more of the sperm need to have normal morphology. (Given that only 4 per cent morphology is considered normal, it
is important that all the other parameters are good!)
 
We can see all these physical characteristics under a microscope, but what the microscope can’t immediately show is whether within the sperm free radicals will have damaged the DNA.

 
What nutrients do healthy sperm need?
The health of the sperm begins with the health of the semen, which contains 22 different nutrients and is rich in minerals – notably calcium, magnesium, phosphorus and zinc, and vitamins B12 and C. Every man should ensure his diet provides a good intake of these vital nutrients.
 
Proteins contain amino acids that are essential building blocks for sperm (protein is also an excellent fuel source). Foods containing the amino acids L-arginine, L-carnitine and L-lysine are all important. Those rich in proteins including L-arginine are fish, poultry and red meat, and dairy products. Once in the body, this amino acid helps to produce nitric oxide (NO), which dilates blood vessels and improves circulation. Better circulation to the groin boosts sperm health and increases sperm motility. L-arginine also plays an important role in cell division, immune function and the release of hormones, and good levels may even improve sperm count.
 
Folic acid (a B-vitamin found, for example, in broccoli, Brussels sprouts, peas and chickpeas) is just as important for men as it is for women because it protects the sperm from DNA damage, including having too many or too few chromosomes (known as aneuploidy).
 
A number of nutrients help to improve the quality of sperm. Vitamin D may boost motility, while zinc improves the quality of the seminal fluid, and increases sperm count, motility and fertilizing capacity, and decreases levels of DNA damage, structural abnormalities and antibodies to sperm that can impair sperm quality.
 
In order to provide sperm with all the energy they need to make their epic journey, men need a good intake of L-carnitine. This amino acid carries high-energy fat compounds into mitochondria cells, where they are burned to release their energy. (Vegans should be aware that plant foods contain no L-carnitine, so must supplement.)
 
Co-enzyme Q10 is another important nutrient for the conversion of food to energy in the cells.
It also boosts sperm motility, because the mid-piece of the sperm needs this nutrient specifically to get the sperm moving and sustain energy to the tail to drive the sperm onwards.
 
Omega-3 fatty acids (see pages 34–5) are essential for sperm health for several reasons. They give the sperm flexibility, helping the head to penetrate the egg. In addition, sperm cells must have specific membrane characteristics in order to be able to bind to the membrane of an egg and produce a living embryo. Much of those special characteristics come from the sperm’s high levels of omega-3 fatty acids.
 
Men with poor sperm quality or sperm counts may typically have low levels of omega-3s, or low ratios of omega-3 to omega-6 fats in their semen and sperm-cell composition. Studies indicate that supplementation with omega-3s can improve total sperm count and concentration. One study showed that an omega-3-rich Mediterranean-style diet boosted the chances of successful pregnancy in previously infertile couples by a staggering 40 per cent. Finally, antioxidants are a must – a good intake protects the health of the head of the sperm (which contains the DNA).
 

What damages sperm?
Apart from sexually transmitted infections, such as chlamydia (which can damage the tubules in which sperm are made and therefore damage sperm) and heat, there is now much evidence that free radicals can damage the DNA that lies within the sperm head. In fact, studies show that at least 30 to 80 per cent of male infertility is linked to oxidative stress (free-radical damage).
It appears that these marauding free-radical cells damage the fatty layers of membranes, such as the acrosome that covers the sperm’s genetic material. (It’s now possible to test for DNA fragmentation – which indicates the likelihood of DNA damage to sperm.)
 
However, oxidative stress is a natural by-product of generating all the energy sperm need to make it to the fallopian tube. And it’s not only the DNA that can be affected. Free radicals damage all the sperm cell membranes and the mitochondria (that convert food energy into usable energy), too. Studies show that men with elevated markers of oxidation have generally impaired sperm count and more abnormally formed cells.
 
No matter where in the body free-radical damage has occurred, including inside the sperm, the best treatment is quite simply to boost the levels of antioxidants in your diet. Those with more antioxidants in their diet have higher sperm counts and better motility. A number of specific antioxidants have proven ability to boost sperm quality. These include vitamins C and E (which help to prevent the sperm clumping, giving them better motility and improving the health of sperm membranes respectively), co-enzyme Q10, selenium (especially for healthy sperm formation and motility), n-acetylcysteine (NAC) and zinc. Lycopene is a natural, plant-derived carotenoid pigment that provides the red colour of tomatoes, watermelon and other fruits. It has powerful antioxidant characteristics. Studies have shown that a lycopene supplement can improve sperm concentration and motility and the general health of the sperm.


Roast Beef Fillet with Roasted Garlic, Tomato & Herb Sauce

Succulent beef served with a delicious rich tangy garlic and herb sauce makes a sensational feast. Beef is an excellent source of selenium and zinc – both of which are important for testosterone production and male fertility. Organic beef is also particularly rich in a fatty acid known as conjugated linoleic acid (CLA) which has a range of health benefits, including immune support, anti-inflammatory properties, improved blood sugar regulation and reduced body fat. Leftover meat can be served cold with salad the following day.

Serves: 4

Preparation time: 15 minutes, plus at least 2 hours marinating

Cooking time: 1 hour 5 minutes
 
1 tsp ground cumin
2 garlic cloves, crushed
2 tbsp olive oil
500g/1lb 2oz beef fillet (in one piece)
baby spinach leaves, to serve
 
For the Roasted Tomato, Garlic and Herb Sauce:
1 bulb of garlic
1 tbsp olive oil, plus extra for drizzling
1 shallot, diced
250g/9oz/1⅔ cups cherry tomatoes
4 anchovy fillets
1 tsp xylitol or caster sugar
1 tbsp balsamic vinegar
25g/1oz/scant ¼ cup sultanas
1 tbsp capers, drained and rinsed
50g/1¾ oz/⅓ cup blanched almonds
4 tbsp extra virgin olive oil
100ml/3½fl oz/generous ⅓ cup passata
1 small bunch of parsley, chopped
1 small bunch of basil, leaves picked
sea salt and ground black pepper
 

1. Mix the cumin, crushed garlic and the 2 tablespoons olive oil together and rub all over the beef fillet. Cover and leave to marinate in the fridge for at least 2 hours, or overnight.

2. For the sauce, preheat the oven to 180°C/350°F/Gas 4. Slice off the top quarter of the garlic bulb. Put the bulb on a piece of foil, drizzle over a little olive oil and season. Wrap up in the foil and roast for 40 minutes. Leave the garlic to cool slightly, then squeeze the roasted flesh out of the bulb into a food processor, discarding the skin. Turn up the oven to 200°C/400°F/Gas 6.

3. Heat the 1 tablespoon oil in a frying pan over a medium heat and sauté the shallot, tomatoes and anchovy fillets with the sugar and vinegar. Cook for 5 minutes, then add to the food processor with the garlic and all the remaining sauce ingredients, except the herbs. Blend to form a thick sauce, adding a little water to thin the sauce slightly, if necessary. Transfer to a saucepan and add the parsley and basil.

4. Remove the beef from the marinade. Heat a heavy-based frying pan and sear the beef on all sides. Place the fillet in a roasting tin and roast for 20 minutes until cooked through. Leave to rest for 10 minutes before carving.

5. Heat the sauce and spoon over the beef. Serve with a baby-leaf spinach salad.


Eat Yourself Pregnant by Zita West

Out August 2014

improve your fertility through your diet

Available for pre-order from Amazon now


Gluten-Free Passionfruit Curd Tarts


From Grace Cheetham Simply Gluten-Free & Dairy-Free

When I was growing up, I adored the lemon curd my mother used to make. This passionfruit version, inspired by her original recipe, has a wonderfully sharp, strong flavour for these tarts.
 

Gluten-Free Passionfruit Curd Tarts

 
Serves: 4

Preparation time: 15 minutes, plus making the pastry and 30 minutes cooling

Cooking time: 10 minutes
 
100g/3½oz dairy-free margarine, plus extra for greasing
rice flour, for dusting
80g/2¾oz/½ cup fruit sugar or caster sugar
1 large egg, plus 3 large egg yolks, beaten
6 passionfruits, halved
1 tbsp apricot jam
 
For the shortcrust pasty
 
75g/2½oz/heaped ⅓ cup rice flour, plus extra as needed
75g/2½oz/⅔ cup gram flour
50g/1¾oz/scant ½ cup ground almonds
50g/1¾oz/scant ⅓ cup fruit sugar or caster sugar
1 tsp xanthan gum
80g/2¾oz chilled dairy-free margarine, diced
1 large egg, beaten
 

How to make gluten-free shortcrust pastry:

Makes enough for 1 x 20cm/8in tart tin or 4 x 10cm/4in tartlet tins Preparation time 10 minutes, plus 30 minutes chilling

1. Sift the flours and xanthan gum into the bowl of a food processor and blend well. Stir in the almonds and sugar. Add the dairy-free margarine and blend until the mixture resembles fine breadcrumbs. Add the egg and blend for 20–30 seconds until the mixture comes together to form a sticky dough. There should be a little extra moisture at the base of the bowl. If it is too dry, gradually add 1–2 tablespoons chilled water. If too sticky, add a little rice flour.
 
2. Shape the pastry into a ball, wrap in cling film and chill in the fridge for 30 minutes.
 

Now, to make the tarts:

 
1. Preheat the oven to 200°C/400°F/gas 6 and grease four 10cm/4in tartlet tins with dairy-free margarine. Liberally dust a chopping board with rice flour and gently roll out the pastry to about 3mm/⅛in thick. Using a pastry cutter that is slightly larger in diameter than the tartlet tins to allow enough pastry for the sides, cut out 4 pastry circles, putting any extra pastry in the freezer for use another time. Be very gentle, as the pastry will still be slightly sticky. Lift the pastry circles into each tart tin (you may need to use a spatula) and press down gently to remove any air pockets. Neaten the edges, using a sharp knife, then line each pastry case with baking parchment and cover with baking beans. Put the tins on a baking tray and bake for 10 minutes or until firm and lightly golden.
 
2. Meanwhile, put the dairy-free margarine and sugar in a large heatproof bowl and rest it over a pan of gently simmering water, making sure that the bottom of the bowl does not touch the water. Heat, stirring occasionally, until the dairy-free margarine has melted, then scoop the passionfruit seeds into the mixture and add the eggs. Stir until the mixture thickens, then set aside to cool. (If you’re not planning to serve the tarts straightaway, store the curd in the fridge once it has cooled.)
 
3. Remove the pastry cases from the oven and remove the parchment and beans. Leave to cool for about 3 minutes, then turn out onto a wire rack and leave to cool completely.
 
4. Spoon the curd into the tart cases and serve immediately. Keep any leftover tarts in the fridge for up to 1 day.
 

Other posts on gluten and dairy free cooking:


Gluten-free-cookbook-author-Grace-CheethamGluten-free author Grace Cheetham reveal that she was proposed to over chocolate fondant in our Q&A with her, where she also reveals the secret of gluten-free baking… Q&A with gluten-free Grace!


best recipe for gluten-free pizzaThe Best Gluten-free and Dairy-free Pizza Recipe! Grace reveals the secrets of making a crispy (and gluten-free) pizza.


These recipes were taken from…

Simply Gluten-Free and Dairy-Free by Grace Cheetham.

176 pages • Illustrated • £12.99

Order now with free UK postage! 

 Gluten Free and Dairy Free cookbook


Chicken & slow-roasted tomato burgers with pesto mayonnaise

From Marcus Bean’s Chickenavailable for pre-order from Amazon now
 
I do love a good burger. My tip for success is to build on the flavour of the minced chicken, starting with the onion and garlic, then adding herbs and sauces. My special ingredient in this burger is the slow-roasted tomatoes, which lift the flavour and give a lovely, fresh kick. Combine it with the fresh basil pesto mayonnaise and you have something really special.

People seem to have problems pan-frying chicken, but it’s wonderully simple. In our busy lives, we often need something that will cook quickly, so pan-fried chicken is a great option. Melt a little butter or oil in a heavy-based frying pan over a medium to high heat and, when it is hot and bubbling, add the chicken. Cook it skin-side down first to give a crisp skin and help to seal in moisture.

I like to fry it until it is coloured and sealed, then finish it in a hot oven, but you can simply cook in the pan until the meat is tender.

This method is best for breast meat and imparts a lovely colour and texture to the chicken. You can cook the breasts whole, in which case this is one of the best ways to get a lovely crispy skin, or slice the meat into goujons or strips for stir-frying quickly over a high heat. Halfway between frying and grilling, if you use a chargrill pan to cook chicken, you’ll get attractive dark bars across the meat.


Chicken & slow-roasted tomato burgers with pesto mayonnaise

Serves: 2

Preparation time: 20 minutes, plus 20 minutes chilling, and making the slow-roasted tomatoes, pesto and mayonnaise

Cooking time: 30 minutes
 

600g/1lb 5oz minced chicken
300g/10½oz Slow-Roasted Tomatoes (see below) or sun-dried tomatoes (not in oil), finely chopped
1 onion, diced
2 garlic bulbs, crushed and chopped
leaves from 2 thyme sprigs, chopped
2 tsp truffle oil
2 tbsp breadcrumbs
2 tsp Worcestershire sauce
½ tsp Tabasco sauce
1 tbsp olive oil
4 bread rolls, sliced in half
1 handful of rocket leaves
sea salt and freshly ground black pepper
 
FOR THE PESTO MAYONNAISE
2 tbsp Fresh Basil Pesto
4 tbsp Mayonnaise
 
To make slow-roasted tomatoes

Makes about 400g/14oz
Preparation time: 10 minutes
Cooking time: 6 hours
 
12 large vine tomatoes
50–100ml/1½–3½fl oz/3 tbsp–scant
½ cup olive oil
2 tbsp sea salt crystals
3 garlic cloves, roughly chopped
leaves from 3 thyme sprigs
 
Preheat the oven to the lowest possible heat, 100°C/200°F/Gas 1. Slice the tomatoes straight down the centre, then cut each half into wedges, making sure all the wedges are the same size. Put on a baking tray, skin-side down. Drizzle with a little of the olive oil, then sprinkle with the salt, garlic and thyme leaves.
 
Roast for 4–6 hours until dried but still slightly flexible, checking every hour as you don’t want them to dry completely. Leave to cool.
 
Spoon into a screw-topped jar and cover with the remaining oil. Store in the fridge for up to a month.
 

To make the burgers

1. Preheat the oven to 200°C/400°F/Gas 6. Put the minced chicken in a bowl and add the tomatoes, onion, garlic, thyme, truffle oil, breadcrumbs and Worcestershire and Tabasco sauces and mix well until combined. Shape into 4 burgers, then cover and chill in the fridge for 20 minutes to firm up while you cook the sweet potato wedges.

2. Meanwhile, mix together the pesto and mayonnaise, cover and chill in the fridge until ready to use.

3. Heat the olive oil in a griddle pan or frying pan over a medium-high heat. Add the burgers and cook for 3–4 minutes on each side until browned, turning the heat down to low if they start to brown too quickly. Transfer to the oven and cook for 5–10 minutes with the sweet potatoes until cooked through and browned.

4. Remove the burgers from the oven, cover and leave to rest in a warm place while you toast the bread rolls. Put some rocket leaves on the bottom half of each bun, top with a spoonful of the pesto mayonnaise, then the burger, another spoonful of pesto mayonnaise, then the remaining bun. Serve with the sweet potato wedges.

 
“In Chicken I have set out to give you the best of the classic chicken recipes, experimenting with modern and unexpected twists along the way. But I have also created new recipes, exploring great flavour combinations that I hope will help you to revolutionize the way you cook with chicken.”
 

Chicken – The New Classics by Marcus Bean

Out September 2014

Chicken---The-New-Classics-by-Marcus-Bean

Available for pre-order from Amazon now


Kale and Soba Noodles with Ginger-Chilli Sauce

From Adele McConnell’s The Vegan Cookbook.

This delicious and nutritious vegan noodle dish makes a perfect quick lunch. Following a plant based diet means enjoying a wide range of healthy and incredibly tasty foods that will make you feel nourished and satisfied. With nutrient-packed kale, and ginger, chilli and lime for a fresh, spicy kick, these noodles are sure to leave you feeling positively perky all afternoon.


Kale and Soba Noodles with Ginger-Chilli Sauce

Serves: 4

Preparation time: 15 minutes

Cooking time: 20 minutes
 
350g/12oz dried soba noodles
1 tsp olive oil or coconut oil
200g/7oz smoked tofu, cut into cubes
3 carrots, cut into matchstick strips
1 large red onion, sliced
200g/7oz button mushrooms, sliced
50g/1¾oz red cabbage, thinly sliced
80g/2¾oz kale, sliced
 
For the Ginger-Chilli Sauce:
1 garlic clove, crushed
2 tbsp soy sauce or tamari soy sauce
2 tbsp toasted sesame oil
2cm/¾in piece fresh root ginger, peeled and grated
juice of 1 lime
1 tsp chilli paste
1 tsp brown sugar or coconut sugar
 

1. Put all the sauce ingredients in a small bowl and add 125ml/4fl oz/½ cup water. Whisk well to combine thoroughly, then leave to one side to allow the flavours to develop.

2. Bring a large saucepan of water to the boil over a high heat, and cook the soba noodles for 4–5 minutes, or according to the pack instructions, until soft. Drain in a colander and leave to one side.

3. Heat the oil in a large wok or non-stick saucepan over a high heat. Fry the tofu for 5 minutes, turning frequently, until golden brown on all sides. Add the carrots, onion and mushrooms, and stir-fry for 1 minute, or until warmed through. Add the cabbage and kale, and cook for 2 minutes, or until they begin to soften. Pour the sauce mixture over the top and cook for a further 3 minutes, stirring frequently. Add the soba noodles and stir to combine. Cook for 1 minute, or until thoroughly heated through. Remove from the heat and serve immediately.


Adele McConnell is the founder of the hugely successful vegan food blog, vegiehead.com, and was the winner of the prestigious ‘Vegan Food Blogger Award’ by The Vegan Woman 2012. She loves sharing her passion for vegan food. Watch her inspiring, easy-to-follow cookery demonstrations on her YouTube channel.


Adele MacConnell - 100 Vegan Recipes

“Feed your soul, taste the love: 100 of the best vegan recipes”

The Vegan Cookbook by Adele McConnell


Click for more info!


Shaved Beetroot, Radish & Grapefruit Salad

Bethany Kehdy's recipe for Shaved Beetroot, Radish & Grapefruit Salad
From Bethany Kehdy’s The Jewelled Kitchen.
 

bethany-kehdy-author-of-the-Jewelled-KitchenThis colourful salad from Bethany Kehdy, crowned the “new champion of Middle Eastern food” by Yotam Ottolenghi, is a delight to look at – and even better to eat! ‘Traditionally the beetroots for this salad are boiled, roughly chopped and served with a tarator dressing, but here they are served raw. If you cannot resist cooking them they can be sautéed for a couple of minutes in sesame oil. I really enjoy the earthiness and crispness of raw beetroot, and if you want a really spectacular showpiece try combining different colours and varieties. The radishes add a great contrast, with their peppery-hot tones, against the sweet-tart grapefruit and the rich, nutty tahini.’
 

Shaved Beetroot, Radish & Grapefruit Salad

Serves: 4

Preparation time: 20 minutes
 
3 tbsp tahini
2.5cm/1in piece of root ginger, peeled and grated
1 garlic clove, finely chopped
5 tbsp verjuice, or lime juice to taste
100g/3½oz radishes
400g/14oz beetroots, peeled
1 pink grapefruit
1 tbsp sesame seeds (optional)
2 tbsp finely chopped dill leaves, plus extra for sprinkling
sea salt and freshly ground black pepper
warm Arabic Bread, to serve (optional)
 
1. Put the tahini, ginger and garlic in a bowl, then season to taste with salt. Slowly pour in the verjuice, whisking quickly as you pour. Set aside. You can prepare this dressing a day ahead to allow the flavours to develop, if you like.
 
2. Using a mandolin on the thinnest setting, slice the radishes, then the beetroots, keeping them separate until assembly. Alternatively, you can use a vegetable peeler or a knife to make thin slices. Arrange the slices on a large platter or in a shallow serving bowl.
 
3. Zest the grapefruit using a zester, removing only the coloured part of the peel and leaving the bitter white pith. If you don’t have a zester, use a vegetable peeler to peel, then finely chop the rind. Put the zest to one side. Peel away and discard any remaining peel and pith and cut the grapefruit into thin slices. Arrange the slices over the beetroots and radishes.
 
4. Sprinkle the zest over the salad and pour over the tahini dressing.
 
5. If using, toast the sesame seeds in a heavy-based pan over a medium heat for 1 minute until golden and fragrant, shaking the pan often. Sprinkle the sesame seeds and dill over the top of the salad and season to taste with pepper. Toss before serving and sprinkle with extra dill. Serve as part of a mezze or as a side dish with warm Arabic Bread, if you like.


Bethany Kehdy is a pioneer of today’s new Middle Eastern cuisine.The Jewelled Kitchen takes you on an unforgettable adventure of Middle Eastern and North African cuisines. From Tuna Tartare with Chermoula and Sumac-Scented Chicken Parcels, to Cardamom-Scented Profiteroles and Ma’amoul Shortbread Cookies – mouth-watering dishes for you to try. Find Bethany at her inspiring food blog dirtykitchesecrets.com.


    “Original and delicious” –  Yotam Ottolenghi

     The Jewelled Kitchen by Bethany Kehdy

      224 pages • Illustrated • £20.00

      AUS $32.99 NZ $42.00

      £20.00 l Buy the e-book now!


Roasted Red Pepper Gazpacho with Serrano Ham Crisps


From Emma MacDonald’s The Bay Tree Home Deli Recipes

Choose the most flavoursome, fragrant, vine-ripened tomatoes that you can find and you’ll be rewarded with the best-tasting gazpacho.
 

Roasted Red Pepper Gazpacho with Serrano Ham Crisps

Serves: 4

Preparation time: 25 minutes plus chilling time

Cooking time: 25 minutes

 
2 romano red peppers
1kg/2lb 4oz large vine-ripened tomatoes
2 slices of day-old bread, crusts removed
1 cucumber, peeled, deseeded and chopped
1 green chilli, deseeded and chopped
1 garlic clove
3 tbsp extra virgin olive oil
juice of 1 lime and 1 lemon
1 tsp caster sugar
a few drops of Tabasco sauce
4–6 slices of Serrano ham
1 handful of basil leaves, for sprinkling
sea salt and freshly ground black pepper
 
For the Croutons:
 
2 slices of day-old bread, crusts removed
1 garlic clove, halved lengthways
2 tbsp olive oil
 
1. Preheat the Grill to high. grill the peppers for 15 minutes, turning them occasionally, until softened and blackened in places. Put the peppers in a plastic bag and leave for 5 minutes (this will make the skins easier to remove). Remove the skin and seeds and leave to one side.
 
2. Meanwhile, using a small, sharp knife, cut a shallow cross in the bottom of each tomato, then put them in a heatproof bowl and cover with just-boiled water. Leave to stand for 2 minutes, then drain. Peel off and discard the tomato skins, then deseed and cut the flesh into large chunks.
 
3. Soak the bread in 150ml/5fl oz/scant ⅔ cup water in a shallow dish for 5 minutes. Remove the bread from the dish (it will have absorbed most of the water) and tear into chunks.
 
4. Put half the soaked bread, roasted peppers, tomatoes, cucumber, chilli, garlic, extra virgin olive oil, lime and lemon juice in a blender with 200ml/7fl oz/scant 1 cup cold water and blend until combined but chunky. Repeat with the remaining ingredients and another 200ml/7fl oz/scant 1 cup cold water. Combine the two batches in a large jug, stir in the sugar and a few drops of Tabasco and season. Chill, covered, for 2–3 hours.
 
5. To make the croûtons, rub the bread slices with the cut side of the garlic cloves. Cut the bread into cubes and put them in a small plastic bag with the oil. Seal the bag and shake gently to coat the bread in the olive oil. Heat a large, non-stick frying pan and fry the croûtons over a medium heat for 6–8 minutes until crisp and golden all over. Leave to drain on kitchen paper.
 
6. Wipe the frying pan clean and add the ham in a single layer. Cook for 3 minutes, or until crisp, turning once. Leave to cool slightly, then break into large bite-sized pieces. Ladle the soup into bowls and scatter the croûtons, Serrano crisps and basil leaves over before serving.


Having grown up on the family’s delicious, homemade Cucumber Relish, Emma Macdonald had the simple idea that full-flavored, quality chutneys and preserves needed to be brought to the specialty sector. In The BayTree Home Deli Recipes she reveals all her deli-ingredient making secrets and shows you how to create delicious meals from them.

 
Bay Tree Home Deli Recipes

“These days, staying in is the new going out, and homemade deli is the way to eat gourmet!”

The Bay Tree Home Deli Recipes by Emma Macdonald

224 pages • Illustrated • £20.00

AUS $32.99 NZ $42.00

£20 l Buy the book now with free UK postage! 


Eat Yourself Pregnant – could your stress levels be affecting your fertility?

From Zita West’s Eat Yourself Pregnant.
 

Zita West is the UK’s most trusted expert on fertility. In her new book, Eat Yourself Pregnant (published this month), she explains how stress is one of the biggest negative factors she comes across when helping couples who want to conceive. She believes that stress management, combined with following certain dietary principles, can make a significant difference to women who experience problems with ovulation specifically and with fertility in general.

 
The biology
Your hypothalamus is your body’s master gland that turns hormone responses on and off throughout your system. It is, therefore, the gland in control of your reproduction hormones – but it is extremely sensitive to stress. Poor diet and lifestyle and a life lived in a constant state of high alert tells the hypothalamus that ovulation needs putting to one side until a state of calm resumes. It stands to reason that if your brain perceives that you are in danger – which it does when you have raised levels of adrenaline and cortisol, preparing you for fight and flight – it also perceives that now would not be a good time to bring a baby into the world. To this end, pulses of follicle stimulating hormone (FSH) and luteinizing hormone (LH) cease, which means that oestrogen levels don’t increase sufficiently to trigger ovulation.

 
Bust your stress
Medical studies on levels of stress hormone and related rates of fertility are inconclusive, but I am convinced that when trying for a baby your mindset plays a huge part in creating the nurturing environment you need to conceive. Many people I see find that a programme of stress techniques and therapies – including hypnotherapy, acupuncture, massage and meditation – can be very effective at dealing with stress. However, relieving stress does not necessarily require formal techniques. These are my top three tips for helping you to overcome stress. You don’t need to implement all three, but if you can you will go a long way to reducing the effects of stress on your chances of conception.

• Aim for between six and eight hours of sleep a night. Too little sleep makes us irritable and exacerbates stress levels. You’re far less likely to feel like getting passionate if you’re overtired and grumpy. You are also more likely to crave sugar, upsetting your blood-sugar balance – which will disrupt hormone levels and result in weight gain.

• Ease your thoughts. Some form of meditation or visualization helps to break patterns of stressful thinking. One of the simplest meditations is to focus on a word or phrase that has meaning for you, such as ‘calm’, ‘peace’ or ‘rest’. Practise your meditation or visualization for 20 to 30 minutes every day. Or, if meditation isn’t for you, try immersing yourself in a good book, writing a journal or simply focusing fully on a certain activity (from chopping vegetables or baking bread, to mending a broken appliance or knitting). The aims are to be undisturbed and completely absorbed in your task or activity.

• Take up regular aerobic exercise. This will help burn off excess adrenaline, leaving you feeling energized, but calmer.

 
A delicious start
Stress can also deplete your body of nutrients, so to get you on the road to a stress-free conception, try these nourishing breakfast recipes from the book for a healthy start to your day.


Breakfast Wake-Up Bars

A healthy cereal bar is perfect if you don’t have time for a sit-down breakfast. These bars contain plenty of protein with the addition of nuts and seeds to keep blood-sugar levels stable throughout the morning. The addition of maca powder is a great way to support the adrenal glands if you’re feeling stressed. Oats are high in slow-releasing carbohydrate and rich in soluble fibre to keep you feeling fuller for longer and avoid mid-morning energy dips. They also contain plenty of vitamin E and energizing B-vitamins, as well as beta glucans that support immune health.

Makes: 16

Preparation time: 15 minutes

Cooking time: 25 minutes
 
olive oil or coconut oil, for greasing
125g/4½oz/heaped ¾ cup cashew nuts
150g/5½oz/1½ cups rolled oats
60g/2¼oz/heaped 1 cup unsweetened coconut flakes
1 tbsp maca powder
1 tbsp shelled hemp seeds
1 tbsp sunflower seeds
1 tbsp flaxseeds
60g/2¼oz/¼ cup chopped ready-to-eat dried apricots
60g/2¼oz/⅔ cup goji berries
a pinch of sea salt
60g/2¼oz/¼ cup almond or cashew nut butter
60g/2¼oz/scant ¼ cup honey
200g/7oz/heaped 1 cup soft pitted dates, chopped
1 teaspoon vanilla extract
 

1. Preheat the oven to 180°C/350°F/Gas 4 and grease a shallow 20cm/8in square baking tin with oil.

2. Put the cashews in a food processor and process until fine. Add the oats and coconut flakes and pulse to break up slightly. Transfer to a mixing bowl and stir in the maca powder, if using, seeds, apricots, goji berries and salt.

3. In a food processor, blend together the nut butter, honey, dates and vanilla extract to form a paste. Mix the paste into the dry ingredients. Spread the mixture into the prepared baking tin. Bake for 20–25 minutes, or until slightly golden. Leave to cool in the tin, then cut into 16 bars.


Stress-Busting Mocha

Rather than resorting to coffee, try this wonderful combination of maca and raw cacao powder for a healthy morning boost. Using cashew nuts creates a creamy texture and also provides plenty of tryptophan to help balance mood. Maca is an incredible fertility super food. It helps to balance the hormones by nourishing and balancing the endocrine system. This is essential in preparing for pregnancy and IVF because healthy hormonal balance greatly contributes to healthier eggs.

Serves: 2

Preparation time: 5 minutes

 
75g/2½oz/scant ½ cup cashew nuts
250ml/9fl oz/1 cup coconut water
1 tsp maca powder
1 banana, chopped and frozen
2 tbsp raw cacao powder
1 tbsp chia seeds
1 tbsp coconut sugar or honey
1 tsp vanilla extract
2 large handfuls of crushed ice
 

1. Put the cashews and coconut water in a blender or food processor and process until smooth. Add the remaining ingredients, except the ice, and process until smooth. Blend in the ice and serve immediately.


Eat Yourself Pregnant by Zita West

Out August 2014

improve your fertility through your diet

Available for pre-order from Amazon now


BBQ Yakitori chicken with apricot bulgar wheat

From Marcus Bean’s Chickenavailable for pre-order from Amazon now
 
Marcus-Bean-author-of-ChickenI love cooking any cuts of chicken on a barbecue, with the extra smoky flavour added to the grilling process. Those with a gas barbecue can add a few smoking chips onto the grill and close the lid for a couple of minutes for similar results.
 
Here I have combined flavours from two continents – the Japanese flavours of mirin, sake and soy with the Middle Eastern sweet fruits and grains. I love the fact that contemporary cooking has broken down so many barriers to experimenting with new ideas.
 

BBQ Yakitori chicken with apricot bulgar wheat

Serves: 4

Preparation time: 15 minutes, plus 1 hour soaking and marinating, and making the stock

Cooking time: 10 minutes
 
8 skinless boneless chicken thighs, cut into 2cm/¾in cubes
 
For the yakitori marinade
250ml/9fl oz/1 cup soy sauce
125ml/4fl oz/½ cup Chicken Stock
125ml/4fl oz/½ cup sake
125ml/4fl oz/½ cup mirin
50g/1¾oz/heaped ¼ cup dark soft
brown sugar
 
For the apricot bulgar wheat
125g/4½oz/²⁄³ cup bulgar wheat
600ml/21fl oz/scant 2½ cups Chicken Stock, boiling
grated zest and juice of ½ lemon
1 tbsp clear honey
2 tbsp chopped chives
1 red onion, finely sliced
200g/7oz/scant 1²⁄³ cups ready-to-eat dried apricots, finely chopped
sea salt and freshly ground black pepper


1. Put the bulgar wheat in a large heatproof bowl, then pour over the hot stock and leave to stand for 25–30 minutes. Soak some wooden skewers in cold water.
 
2.Meanwhile, put the marinade ingredients in a saucepan over a medium heat and warm gently until the sugar has dissolved, stirring occasionally. Pour into a bowl or jug, leave to cool slightly, then chill in the fridge for 15 minutes.
 
3.Put the chicken pieces into a bag or bowl and pour over the cooled yakitori marinade. Cover and leave to marinate in the fridge for about 30 minutes.
 
4. Preheat a griddle pan or barbecue until hot. Thread about 4 pieces of chicken on each skewer. Drain any excess liquid from the wheat, then stir in the lemon zest and juice. Mix in the honey and chives, then the red onion and apricots. Season with salt and pepper to taste, then leave to one side.
 
5.Cook the skewers for 1–2 minutes on each side until cooked through and tender. Leave to rest for 1 minute, then serve with the apricot bulgar wheat.

 
“In Chicken I have set out to give you the best of the classic chicken recipes, experimenting with modern and unexpected twists along the way. But I have also created new recipes, exploring great flavour combinations that I hope will help you to revolutionize the way you cook with chicken.”
 

Chicken – The New Classics by Marcus Bean

Out September 2014

Chicken---The-New-Classics-by-Marcus-Bean

Available for pre-order from Amazon now


Top Tips for Cooking Outdooors – Camping Stove, Open Fires and Barbecues

cooking-outdoors
 
Planning an adventure to the great outdoors? With a little bit of know-how, you can create delicious food without the safety of your workaday electric oven. In fact, Tiff and Jim Easton have written a book all about cooking outdoors, the Family Camping Cookbook, and they have a few tips for making the most of escaping urban life and cooking at the beach, camping holiday or even a BBQ in the park.
 
Once you’ve learnt how easy it is, you can apply your new skills to their fabulous Mediterranean Butterflied Lamb with Foil-Roasted Vegetable Couscous below. Be happy, campers!
 

Top Tips for Cooking Outdoors

There are a few principles to bear in mind when cooking in the outdoors. First is to always use your heat wisely. Save boiled water to do your washing up, and always make the most of the heat on a barbecue or fire. We often cook some meat for our next day’s lunch on the barbecue the night before, and have even used pasta cooking water to fill our hot water bottles!
 
Second is to make sure you take the right pans to cook in. Many of the recipes in this book can be cooked in one pan and never need more than two. Whether you are cooking on a gas stove, barbecue or on an open fire, if your pans are large enough and have a heavy base, you’ll find they will work whether you are boiling, frying or grilling your food.
 
It’s good to remember that whatever your cooking source, it is less controllable than your cooker at home and probably not as hot. So boiling large quantities of water for long periods should be avoided. For best results when pan-frying, work in small batches as overcrowding the pan will cool it down. A pan lid is indispensable as it speeds up cooking times. It’s also worth remembering that the weather can affect cooking times. In cooler, gustier weather, the flames are not as hot or intense as on still, warm days.
 

Cooking on Camping Stoves

 
Most of the time you will probably be cooking on a camping stove. There are many different varieties, from single-hob versions in their own carrying case to multi-hob stoves. A single-hob stove is good to take to the beach, but if you are camping and cooking regularly then a double-hob version is better. Some also have a grill underneath and a lid that doubles as a wind-shield – important as even a light breeze can slow down cooking times noticeably. If you don’t have this feature, cook behind (but not too close to) some kind of makeshift windbreak.
 
You can normally choose between butane and propane as your gas supply; we prefer propane as we find it cooks hotter. If you’re only taking a stove, make sure you take a griddle pan with you as it allows you to grill over the flame, much like a barbecue.
 

Cooking on Barbecues

 
Barbecues are an essential part of the camping experience. Although open fires aren’t always allowed in campsites, barbecues normally are. If your campsite allows, you can build your own barbecue with bricks or stones and a simple metal grill. Otherwise a simple, low barbecue should do the trick – there is a huge choice out there, including folding ones.
 
Most pots and pans can be used on a barbecue as long as you don’t mind them blackening on the outside. Cast-iron pots are probably best, but there are many other lighter varieties available. The good thing about a barbecue – especially if you have the bucket type – is that once you have finished cooking, you can turn it into a campfire simply by adding some wood. Disposable barbecues are no substitute for the real thing – they generally don’t get as hot and burn out too quickly.
 

Cooking on Open Fires

 
We always try to seek out campsites that allow open fires. Cooking on open fires offers endless possibilities: you can fry, boil, grill, roast and even bake on them, but it does require a bit of practice and the right equipment. A good big metal grill, ideally with feet to stand over the embers, is essential, and pots, pans and kettles with handles that don’t melt are also a good idea. If you are cooking meat, fish or vegetables directly over the fire, as you do on a barbecue, you should wait until the flames have died down and you have glowing embers to cook on.
 
If you are cooking in a saucepan or boiling a kettle, you can cook over the flames, but they will tarnish the outside of the pots so don’t take your best set. A selection of good-sized stones are useful for supporting the pots and pans in the fire. And for fire safety reasons it goes without saying that you should always have a bucket of water to hand when cooking over an open fire or a barbecue.
 
Now, if you’re feeling adventurous, you can try this simply delicious (and deliciously simple) lamb recipe, which is perfect for your next day at the beach.
 
Mediterranean-Butterflied-Lamb-with-Foil-Roasted-Vegetable-Couscous

Mediterranean Butterflied Lamb with Foil-Roasted Vegetable Couscous

Serves: 4
 
Preparation Time: 25 minutes, plus at least 1 hour marinating
 
Cooking Time: about 30 minutes
 
juice of 1 lemon
2 garlic cloves, crushed
2 tsp smoked paprika
2 tbsp olive oil
1 butterflied leg of lamb
salt and pepper
 
Foil-roasted vegetable couscous:
 
500g/1lb 2oz vegetables such as squash, onions, peppers and leeks, cut into bite-sized chunks
5 garlic cloves, peeled but left whole
4 tbsp olive oil
200g/7oz/1 cup couscous
salt and pepper
 
1. In a large plastic freezer bag, mix together the lemon juice, crushed garlic, paprika and oil. Using your hands, rub the mixture all over the lamb. Cover and leave to marinate in a cool box for at least 1 hour, preferably 3–4 hours.
 
2. Put the vegetables and the whole garlic cloves on a piece of foil large enough to make a parcel. Drizzle with the oil and season with salt and pepper. Pull up the foil to enclose, tightly sealing the seams of the parcel to prevent them from leaking. Cook in the embers of a barbecue or open fire for about 30 minutes until the vegetables are tender. Remember to move the parcel from time to time to allow the vegetables to cook evenly. Alternatively, cook over a high heat in a griddle pan for 8 minutes on each side.
 
3. Season the lamb with salt and pepper. Cook over a high heat on a barbecue or in a griddle pan for about 5–8 minutes on each side, depending on how pink you like the meat. Remove from the heat, cover and leave to rest for 10 minutes.
 
4. Meanwhile, put the couscous in a large bowl and pour over 290ml/10fl oz/generous 1 cup boiling water. Season with salt and pepper and cover. Leave to soak for at least 5 minutes until the grains are tender.
 
5. Fluff up the couscous with a fork and stir in the roasted vegetables and their juices. Thickly slice the lamb and serve hot with the couscous.
 
And if you’re planning a camping trip, take a look at this paella recipe, designed to be cooked on a camping stove!
 
The Family Camping Cookbook is packed with delicious recipes for camping adventures – whether you’re on a quick escape, by the beach, in the country, at a festival or camping with a crowd. Make the most of cooking in the great outdoors!

Family Camping Cookbook by Tiff & Jim Easton
£10.99

Order now with free UK postage!


Home